


Click HERE to check out the latest awesome Club Video, courtesy of NPOC Member edk_N16 - Thanks Ed! |
P12 Blank Console Screen Repair |
Post Reply 
|
| Author | |
imckay 
NPOC Member 
Joined: 11 Mar 2007 Location: Lancashire Online Status: 
Points: 2778 |
 Post Options Post Options
") Thanks(4) Thanks(4)
 Quote Reply Quote Reply
 Topic: P12 Blank Console Screen Repair Topic: P12 Blank Console Screen RepairPosted: 12 Oct 2009 at 5:10pm |
|
This is a work in progress. I do not have a P12 and will need some info to complete this guide. See bits in red.
If anyone has any advice or comments, I am more than willing to edit
Disclaimer: Any repairs you attempt using this guide are at your own risk.
See further down the thread for prices if a mistake is made.
This guide is for the P12 2002 to 2005 with the Sat Nav DVD drive mounted in the dashboard below the screen.
The fault
The centre console screen does not work. The heating controls do not work. The Audio does not work. The fault tends to appear during cold weather and may dissapear when the car's interrior warms up. Remove the ashtray and heat the back of the DVD drive with a hairdryer. If the screen comes to life within 5 minutes, this will confirm that the DVD drive can be fixed. This is just a test and will not permanently fix the problem.
The cause On the DVD drive, there is a DC/DC converter which converts incoming voltages to the voltages required to power up the screen. On this DC/DC converter there is a transistor which sits between 3 coils. Coils naturally vibrate when powered. Manufacturers use a glue to stop this vibration and the resulting noise. On the Nissan Primera DVD drive, this glue comes into contact with a transistor. It appears that the vibration is transferred from the coils to the transistor breaking the solder joint to the circuit board. During cold weather the glue contracts and lifts the transistor away from the circuit board. Images DVD Drive with the metal cover removed.
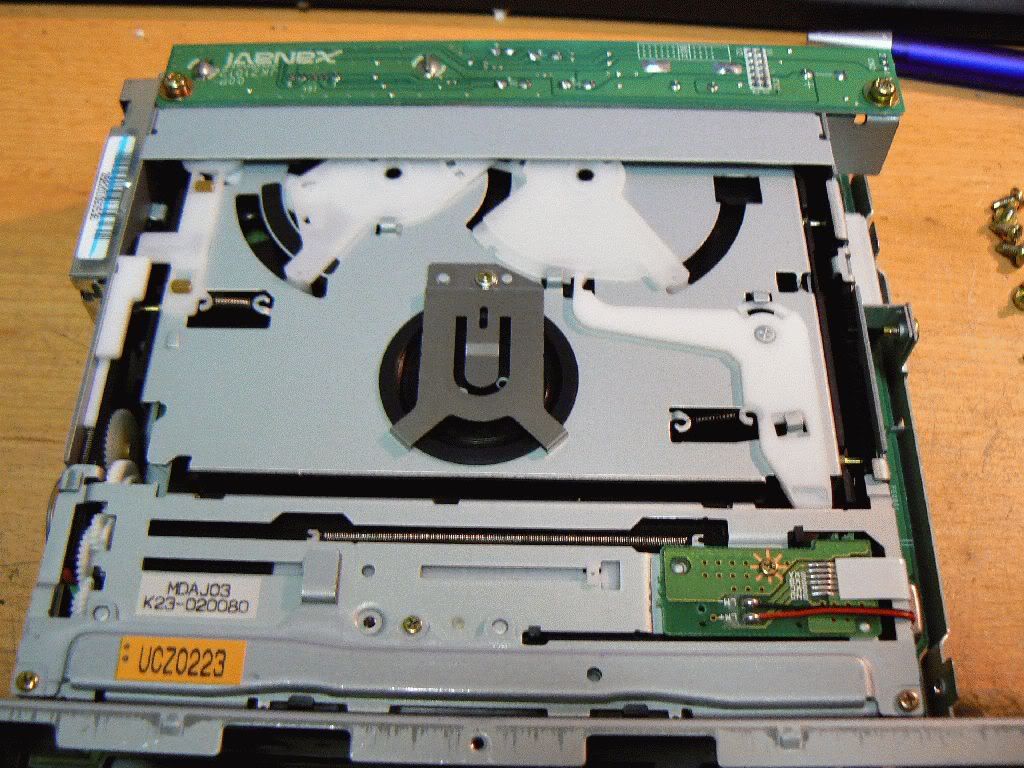 The long board removed from the DVD player. The DC/DC converter where the fault lies is inside the metal box. 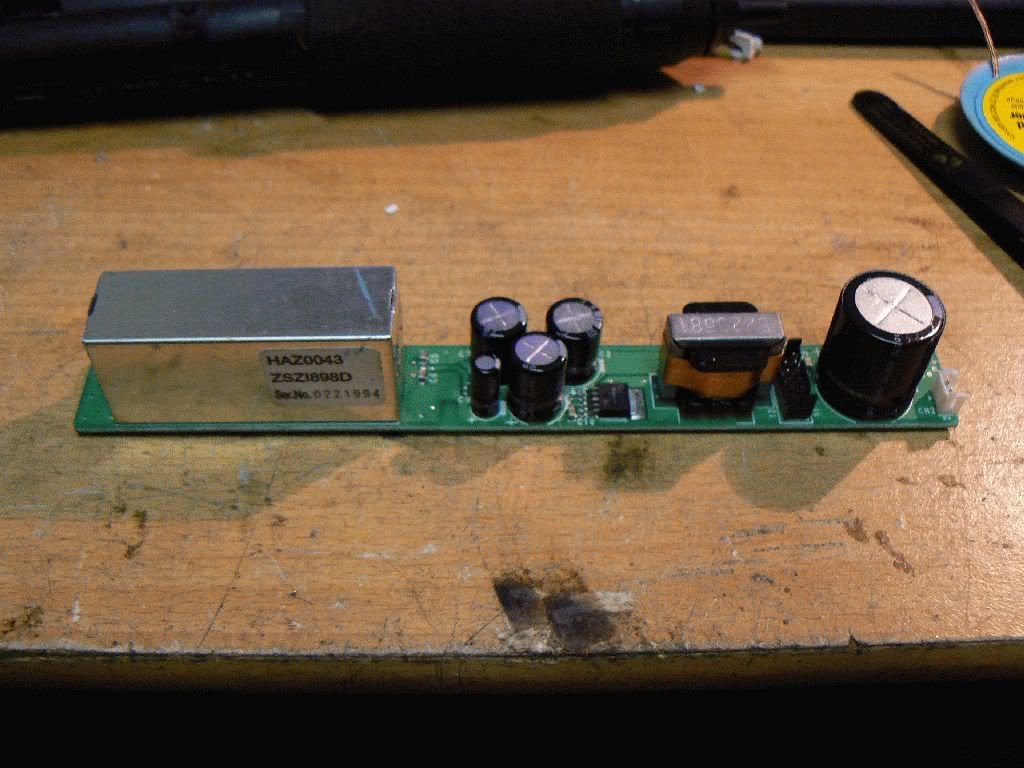
The DC/DC converter removed from the long board. Note the glue between the 3 blue coils
 The DC/DC converter with the glue removed. Note the transistor (tiny black square between the 2 blue coils marked 100) 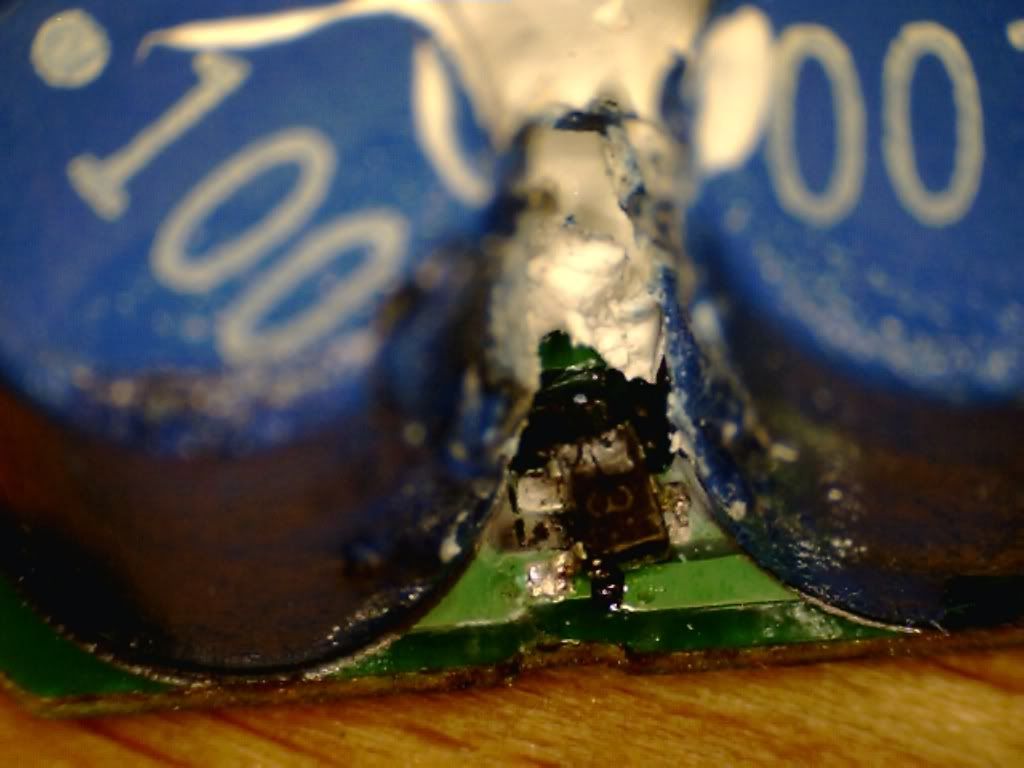 A drawing showing the fault and what the screw repair is trying to achieve.
  Positioning of the screw to apply pressure to the glue
 Removing the DVD drive from the car
There are already 2 good guides to doing this The second guide is for repairing a fault on the CD player. Use the guide for removing the dashboard.
Unplug the cables from the back of the DVD drive. Remove 4 screws securing the DVD drive to the CD/ashtray brackets. Loose the 4 screws securing the CD player to the brackets if the DVD won't come out easily.
Disassembly of the DVD drive and removal of the wide board
Remove 2 screws from each side of the drive and one from the top at the front centre
The metal case should now lift off.
Remove the 2 screws securing the wide board to the DVD drive. Lift carefully and unplug the cable.
Confirmation of this and pics required
If you intend sending the DVD drive or the long board away, heat the back of the DVD drive with a hairdryer to get the screen working temporarily and set the cabin temperature.
If you don't feel confident in removing the DVD drive from the car, a car radio installer or garage may be able to help. Repair Options
A new DVD drive from Nissan. This will cost up to £2000 An exchange DVD drive from Nissan or Clarion. This will cost up to £700 A DVD drive from a Breakers. If the whole DVD player is used it will need to be reset by Nissan or Clarion. You will get a 'Secure' message on the screen. Brand new DVD players come from the factory with no code. The DVD drive codes itself to the car's ECU (computer) and will only work in that car unless reset. The long board can be swapped from the replacement DVD drive and no coding will be necessary. Bear in mind that a DVD drive from a breakers may have the same problem or may develop it. Resoldering the transistor to the board. The transistor is tiny (1mm x 1.5mm). This should not be attempted unless you are VERY experienced with soldering surface mount components. Remove the long board from the DVD drive. Desolder the metal box covering the DC/DC converter. Desolder the DC/DC converter from the long board. Heat the glue with a hot airgun. It should now be soft enough to pull away from the board. The transistor is likely to be stuck in the glue. Put the transistor somewhere very safe. Desolder the 3 coils (2 marked 100 and 1 marked 680) to improve access when resoldering the transistor to the board. To date I have resoldered 2 of these. If you are considering having a go yourself please feel free to send me a private message for advice. Laptop and TV repair shops will have suitable equipment and skills to perform the solder fix. Fitting a screw to apply pressure to the glue and prevent the transistor from moving. Popswoo's description here.
Additional Notes
According the Russian Primera Club, the transistor is a BC856A. Available from electronic component suppliers. Only required if a transistor gets lost or damaged.
Also, I am now aware that Clarion Service provide a repair service for around £140 where they send the DVD to Xanavi in Japan.
Update November 2010 £175. Clarion UK have a float stock of the faulty boards, improving turnaround time. |
|
 |
|

 Topic Options
|
Post Reply
|
|
| Forum Jump | Forum Permissions You cannot post new topics in this forum You cannot reply to topics in this forum You cannot delete your posts in this forum You cannot edit your posts in this forum You cannot create polls in this forum You cannot vote in polls in this forum |